How to Use Snap Layouts in Windows 11

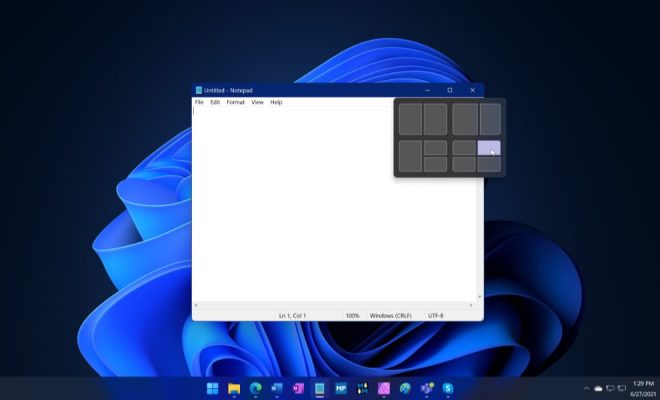
Windows 11 comes with a new feature called Snap Layouts, which makes it easy to organize and arrange your open windows on your screen. With Snap Layouts, you can quickly snap your windows into pre-defined layouts, saving you time and effort.
Here’s how to use Snap Layouts in Windows 11:
Step 1: Open the windows you want to organize
To use Snap Layouts, you need to have at least two windows open on your screen. You can open the windows you want to organize by clicking on their respective icons on the taskbar or by using the keyboard shortcut “Windows key + number key” (e.g., Windows key + 1 will open the first app on your taskbar).
Step 2: Choose a Snap Layout
Once you have your windows open, hover your mouse over the maximize button on any window. You will see a preview of the available Snap Layouts. You can choose the one that best fits your needs.
There are several Snap Layouts to choose from, including:
1. Two windows side by side
2. Three windows side by side
3. Four windows in a grid
4. One large window with two smaller windows on either side
Step 3: Snap your windows into place
Once you have chosen a Snap Layout, click on the preview to snap your windows into place. You can also use the keyboard shortcut “Windows key + left/right arrow” to snap a window to the left or right side of your screen.
If you want to snap more windows, simply drag them to the appropriate side of your screen until they snap into place.
Step 4: Customize your Snap Layouts
If you want to customize your Snap Layouts, you can do so by clicking on the maximize button again and selecting “Snap Layouts.” From there, you can create your own custom Snap Layouts or edit existing ones.
Conclusion
Snap Layouts is a handy feature in Windows 11 that makes it easy to organize and arrange your open windows on your screen. With just a few clicks, you can snap your windows into pre-defined layouts, saving you time and effort. Give it a try and see how it can help you be more productive!


