How to Use Data Validation in Google Sheets

Google Sheets is a great tool for managing and analyzing data. One of the key features of Sheets is Data Validation, which allows users to set limits on the data that can be entered into a cell or range of cells. In this article, we’ll explore how to use Data Validation in Google Sheets to improve accuracy and efficiency in your data management.
Step 1: Select the cell or range of cells
The first step in using Data Validation is to select the cell or range of cells that you want to apply it to. To do this, simply click on the cell, or click and drag to select a range of cells.
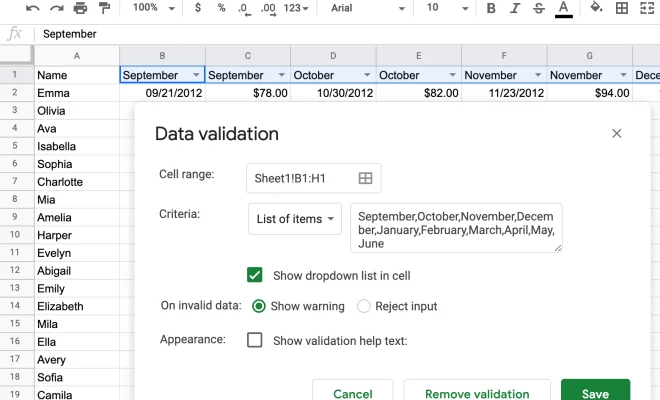
Step 2: Open the Data Validation dialog box
Next, you’ll want to open the Data Validation dialog box. To do this, click on the Data tab in the top menu, then choose Data Validation from the drop-down menu.
Step 3: Choose a validation rule
Once you’ve opened the Data Validation dialog box, you can choose from a variety of validation rules to apply to your selected cells. These rules will help ensure that the data entered into the cells is accurate and consistent.
For example, you might choose to require that a cell only accept a specific set of responses, such as “Yes” or “No”. Or you might require that a cell only accept numeric values within a certain range.
Step 4: Set the criteria for validation
After choosing a validation rule, you’ll need to set the criteria for validation. This means specifying exactly what type of data should be allowed in the cells you’ve selected.
For example, if you’ve chosen to only allow numeric values within a certain range, you’ll need to specify the minimum and maximum values allowed. Or if you’re requiring a specific set of responses, you’ll need to list those responses in the appropriate section of the dialog box.
Step 5: Choose an error message
If someone attempts to enter data into the selected cells that violates your validation criteria, they’ll see an error message. You can customize this error message to make it clear what the problem is and what needs to be done to correct it.
For example, you might choose to display an error message that says “Please enter a number between 1 and 100” if someone tries to enter a value outside of that range.
Step 6: Save and apply the validation rule
Once you’ve set up your validation criteria and error message, you’ll want to save your changes and apply the validation rule to the selected cells. To do this, simply click the Save button in the Data Validation dialog box.
Now, any time someone tries to enter data into the selected cells that violates your validation criteria, they’ll see your customized error message.
In conclusion, Data Validation is a powerful tool for ensuring the accuracy and consistency of your data in Google Sheets. By following these simple steps, you can set up validation rules that will improve the efficiency and accuracy of your data management.


