How to Upgrade a Processor
Introduction:
Upgrading your computer’s processor is an excellent way to increase its performance and extend its lifespan. In this article, we will cover the necessary steps and precautions for a seamless processor upgrade.
1. Research Compatible Processors
Before purchasing a new processor, research your computer’s chipset. Each chipset supports specific processor models, so ensure you’re purchasing a compatible one. Websites like CPU-Upgrade and Intel Ark can help you in your search.
2. Backup Your Data
Always backup your data before making any hardware modifications. Upgrading your processor involves handling sensitive components that can be damaged, leaving you with a nonfunctional computer.
3. Collect Necessary Tools and Prepare Your Workspace
Gather the tools required for upgrading your processor. Typically, you’ll need:
– A Phillips screwdriver
– Thermal paste
– Isopropyl alcohol (90% or higher)
– Lint-free fabric
– A wrist strap (to eliminate static discharge)
Choose a workspace that offers good lighting and plenty of space to place parts in an organized manner.
4. Power Down Your Computer
Disconnect all peripherals and unplug your computer from the power source.
5. Open Your Computer Case
Remove the side panel of your computer case using a screwdriver and set it aside.
6. Ground Yourself
To minimize the risk of electrostatic discharge damaging your components, connect the grounding wire from a wrist strap to a grounded metal object (such as the computer case itself).
7. Remove Old Thermal Paste from CPU Cooler
If you’re reusing the same CPU cooler, use isopropyl alcohol and lint-free fabric to remove any old thermal paste from its surface.
8. Remove Current Processor
Gently lift the CPU cooler off the processor, unclipping any retaining brackets on it step-by-step.
Unlock the CPU socket latch and carefully lift the old processor from the socket without any force. Store it in an anti-static bag.
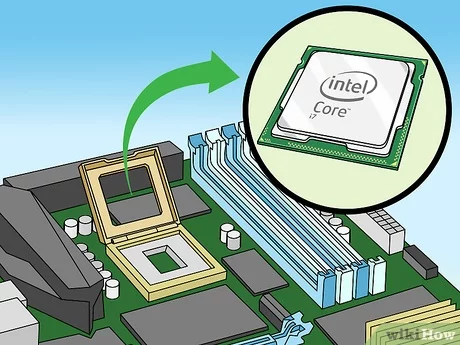
9. Install New Processor
Align the new processor with the socket, ensuring that the markings or notches overlap. Gently lower the processor onto the pins and lock it in place by closing the socket latch.
10. Apply Thermal Paste
Apply a pea-sized amount of thermal paste onto the center of your processor. Too much can negatively impact heat transfer. Follow the instructions provided by the paste manufacturer.
11. Attach CPU Cooler
Carefully attach your CPU cooler to the new processor, securing it as per your cooler’s instruction manual.
12. Reassemble Your Computer
Once everything is securely in place, close your computer case, reattach any peripherals, and plug it into a power source.
13. Test Your Upgrade
Turn on your computer and access the BIOS/UEFI to verify that your new processor is recognized. If everything looks good, exit BIOS/UEFI and boot into your operating system.
Conclusion:
Upgrading your computer’s processor can significantly enhance its performance. By following this step-by-step guide, you can confidently upgrade your system and enjoy a smoother computing experience.