How to Set up FaceTime on an iPod Touch

Apple’s FaceTime is a popular video chat application that allows users to connect with others face-to-face through their device’s camera. While iPhones and iPads have FaceTime built-in, setting it up on an iPod Touch requires a few additional steps. Here’s how to set up FaceTime on an iPod Touch:
1. Update your iPod Touch to the latest operating system
Before setting up FaceTime, ensure that your iPod Touch is updated to the latest operating system. This can be done by going to “Settings” > “General” > “Software Update” and checking for any available updates.
2. Sign in to iCloud
To use FaceTime on the iPod Touch, you need to have an Apple ID and sign in to iCloud. If you don’t have an Apple ID, you can create one by going to appleid.apple.com. Once you have an Apple ID, go to “Settings” > “Sign in to your iPod” and enter your Apple ID and password.
3. Enable FaceTime in Settings
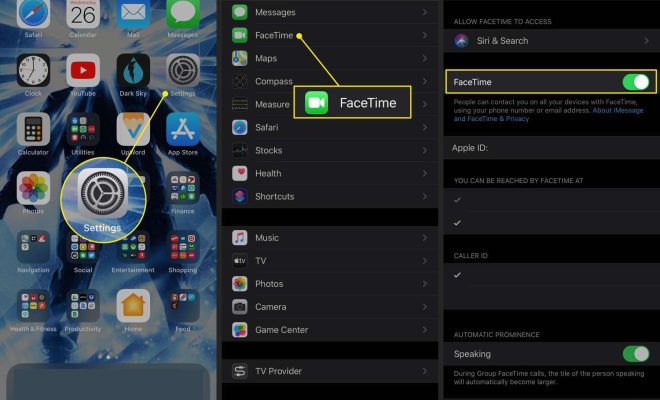
After signing in to iCloud, go back to “Settings” and scroll down to “FaceTime.” Tap on it, and then toggle the switch to the on position. This will activate FaceTime on your iPod Touch.
4. Add your phone number and email address
To use FaceTime, you need to add a phone number or email address to your FaceTime account. In the FaceTime settings, tap on “Add Another Email” or “Add Another Phone Number” and enter the information. You can add multiple email addresses and phone numbers to use with FaceTime.
5. Start a FaceTime call
With FaceTime enabled and your contact information added, you can start a FaceTime call. Open the FaceTime app on your iPod Touch, and then select the person you want to call from your contacts list. Tap their name, and then tap the FaceTime icon to start the call.
Setting up FaceTime on an iPod Touch is quick and easy, but it requires a few additional steps compared to other devices. Once set up, however, you can enjoy face-to-face conversations with friends and family all over the world.


