How to Properly Place a TB Skin Test

Tuberculosis (TB) is a serious and contagious bacterial infection that primarily affects the lungs. A TB skin test is an important diagnostic tool used to identify individuals who may have been exposed to the disease. Administering this test correctly is vital in order to ensure accurate results. This article will provide a step-by-step guide on how to properly place a TB skin test.
Step 1: Gather materials and prepare the patient
Before starting the test, ensure that you have all the necessary materials on hand, including a sterile needle, syringe, and purified protein derivative (PPD) solution. Inform the patient about the procedure and discuss any possible side effects or concerns they might have. Obtain their consent before proceeding.
Step 2: Prepare the PPD solution
Using a new syringe and needle, draw up 0.1 mL of PPD solution from the vial. This amount contains five tuberculin units (TU), which is the standard dosage for adults.
Step 3: Choose the correct injection site
The inner surface of the forearm is typically used for TB skin tests, as it provides an area with minimal hair and veins, allowing for easier administration and evaluation. Have the patient rest their arm on a flat surface and choose a spot approximately two finger-widths below their elbow.
Step 4: Clean the injection site
Swab the chosen injection site with an alcohol prep pad or cotton ball dipped in alcohol to disinfect it. Allow it to air dry before proceeding.
Step 5: Administer the test
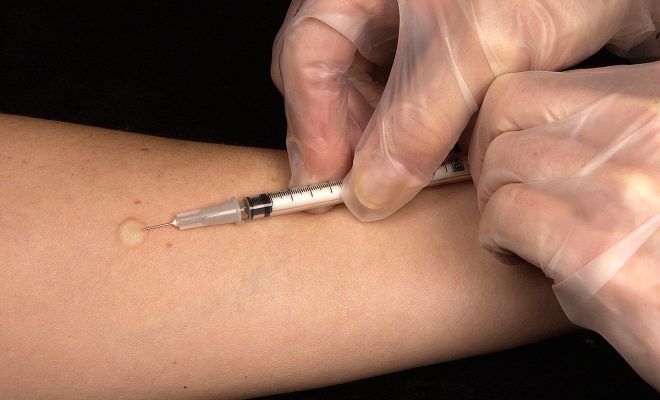
Hold the syringe at a slight angle (approximately 10-15 degrees), with the needle pointing upward toward the patient’s elbow. Insert it slowly into their skin so that only its beveled tip goes beneath their skin. Remember, this is an intradermal injection – it should be very shallow, just below the surface of the skin.
Step 6: Inject the PPD solution
While holding the syringe in place, use your free hand to gently stretch the patient’s skin around the injection site. Slowly push down on the plunger to inject the PPD solution. A small raised welt, also called a “bleb” or “wheal,” should form as you inject the solution. This indicates that you’ve properly placed the injection just below their skin’s surface. If no wheal forms, you may need to re-administer the test at a different site.
Step 7: Disposal and documentation
Safely discard the used needle and syringe in a sharps container to prevent injury or contamination. Document all relevant information, such as date and time of the test, dosage administered, and any patient reactions.
Step 8: Provide patient instructions
Instruct the patient to avoid scratching, rubbing, or putting any adhesive bandages on the test site. Inform them that they will need to return within 48-72 hours for an evaluation of their results.
Properly administering a TB skin test is crucial for obtaining accurate results and ensuring patient safety. By following these steps and utilizing careful technique, healthcare professionals can contribute to the timely diagnosis and treatment of tuberculosis.

