
How to Install Marble Floor Tile
Marble flooring is an elegant and luxurious choice for any home. Known for its timeless appeal and durability, marble floor tiles can elevate the look and feel of a space. Installing marble floor tile may seem like a daunting project, but with the right tools, preparation, and patience, you can achieve professional-looking results. In this article, we will provide a step-by-step guide on how to install marble floor tile.
1. Gather the necessary materials and tools
To install marble floor tiles, you will need:
– Marble tiles
– Tile spacers
– Notched trowel
– Mortar mix (specifically designed for natural stone)
– Level
– Rubber mallet
– Wet saw or tile cutter
– Sponge
– Grout (color of your choice)
– Grout float
– Large bucket
– Clean cloth
2. Prepare the subfloor
Proper preparation of the subfloor is essential for the successful installation of marble tiles. Make sure your subfloor is level, clean, and free from debris, grease, or oils. If necessary, use self-leveling concrete to achieve a smooth surface.
3. Plan and set up the layout
Take measurements of your space to determine how many tiles you will need. Create a blueprint of your room and mark where each tile will be placed. Use a chalk line or straight edge to mark your starting point at the center of the room.
4. Mix the mortar
Follow the manufacturer’s instructions on mixing mortar specifically designed for natural stone. Ensure that it has reached a smooth consistency before application.
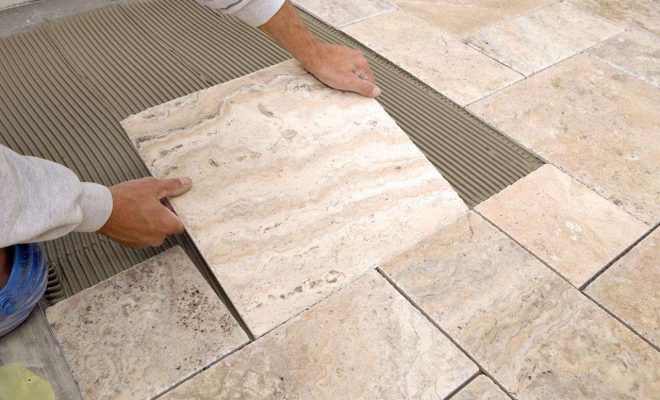
5. Begin setting the tiles
Starting from your marked center point in the room, apply an even layer of mortar using a notched trowel at a 45-degree angle. Press the first marble tile into place with your hands or using a rubber mallet, ensuring it is level. Continue setting tiles in straight rows, using tile spacers to maintain an even gap for grout lines.
6. Cut tiles as needed
For edges, corners, or around fixtures, use a wet saw or tile cutter to cut the marble tiles to fit. Keep in mind that natural stone requires extra caution when cutting, ensuring a slow and steady approach.
7. Grout the tiles
After allowing the mortar to set for at least 24 hours, remove the spacers and start applying grout using a grout float. Fill the gaps between tiles evenly and scrape off any excess grout from their surfaces. Use a damp sponge to clean the surface of each tile as grout is applied.
8. Allow for drying and apply a sealant
Give your new marble flooring ample time to dry, typically 24-48 hours before walking on it or installing any furniture. Finally, apply a sealant suitable for natural stone tiles to protect your marble flooring from stains and preserve its lustrous appearance.
With these eight steps, you can successfully install beautiful and elegant marble floor tiles in your home. Remember to follow appropriate safety precautions when handling heavy materials and using power tools to ensure a smooth and successful installation process. Enjoy your luxury marble floor!


