How to Draw Human Faces: 9 Steps
Drawing a human face can be a challenging yet rewarding experience for artists of all levels. With practice and attention to detail, you can create realistic and expressive portraits that show off your artistic prowess. In this article, we will guide you through nine steps on how to draw human faces with ease.
1. Gather your materials
Before getting started, gather the tools you’ll need which include paper, pencils or charcoal, erasers, and a sharpener. Make sure to work in a well-lit space with comfortable seating.
2. Sketch out the basic head shape
Begin by lightly sketching an oval shape that will serve as the base of the head. Adjust the length and width to represent the person’s unique face shape. The width is generally about two-thirds of the length.
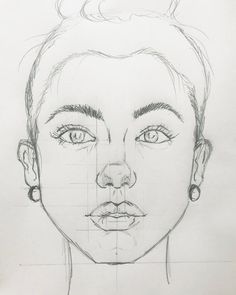
3. Divide into sections
Draw two lines intersecting at the center of the oval: one vertical line for symmetry and one horizontal line for eye placement. The horizontal line should sit roughly halfway down the oval.
4. Add guidelines for facial features
Add more guidelines based on facial proportions:
– Draw a horizontal line halfway between the first horizontal line and chin for nose placement.
– Add another line halfway between the nose line and chin for mouth placement.
5. Place eyes, nose, and mouth
Using these guidelines, sketch out basic shapes for facial features:
– Eyes should sit on either side of the vertical line and gently spaced along the first guideline.
– For the nose, draw small triangle or trapezoid shapes based on reference images or personal style.
– Create lips by sketching two curved lines along the bottom guideline (one for top lip, one for bottom lip).
6. Add additional facial features
Sketch eyebrows above eyes using soft curve strokes and carefully shape ears on both sides of head in alignment with top of eyes down towards nose base.
7. Refine facial features
Refine the facial feature drawings, adding detail to the eyes, nose, and mouth. Make sure to add realistic contours to represent eyelids, nostrils, cheeks, and jawline.
8. Add shadows and highlights
Once you’ve refined your facial features, start shading your portrait to give it dimension and depth. For more realism, softly blend the shadows around eyes, nose, and mouth using a clean blending tool, like a paper stump.
9. Final touches and clean-up
Add hair or any other accessories that you’d like to include in your portrait. Finally, use an eraser to remove any visible guidelines or smudges outside your drawing’s lines.
Take a moment to admire your masterpiece! Following these steps will help improve your skills as you practice drawing faces consistently. Keep in mind that every face is unique, so observe different subjects and adjust proportions accordingly to achieve the desired likeness. Most importantly: have fun and keep practicing!