How to Connect an iPhone to a Mini Projector

As technology continues to evolve, we find ourselves utilizing our mobile devices for more and more tasks. However, sometimes the small screen of our mobile devices just isn’t enough – particularly when sharing content with a group of people. That’s when projectors come in handy. Mini projectors, in particular, are an excellent solution when you need a portable, lightweight device that can be easily connected to your mobile phone. In this article, we’ll guide you through the process of how to connect an iPhone to a mini projector.
1. Check the compatibility of your iPhone and Projector
Before you start, it’s essential to ensure that your iPhone and mini projector are compatible. Check the projector’s manual to see what type of inputs are available. Most modern mini projectors have HDMI or USB inputs, which means you can connect your iPhone with a cable. Some older projectors may only have VGA ports, which your iPhone doesn’t have. If your projector has a VGA port, you may need to purchase an adapter that will convert VGA to HDMI.
2. Purchase the Correct Cable or Adaptor
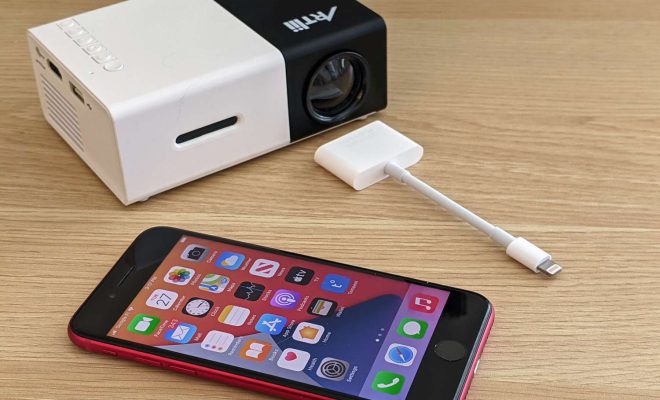
Once you’ve determined what inputs your projector has, you’ll need to purchase the appropriate cable or adaptor. For HDMI input, you’ll need a lightning-to-HDMI cable. For USB input, you’ll need a lightning-to-USB adapter. The lightning connector is the charging port on your iPhone, which is a small, rectangular port found on the bottom of your phone.
3. Connect your iPhone to the Mini Projector
Connect one end of the cable (or adapter) to your iPhone’s lightning port, and the other end to the projector’s input port. Turn on the projector and select the input source that matches the one you’ve plugged the cable into.
4. Adjust the Dimensions and Viewing Settings
Once you have set up your iPhone and the mini projector, you may need to adjust the dimensions and viewing settings. By default, the projector may not display your screen in a way that is desirable. Most projectors come with settings for brightness, contrast, color saturation, and resolution. It is essential to adjust these settings to ensure that the image is clear, sharp, and visible to everyone watching. You can also adjust the projection size of the image. This can be done by moving the projector closer to the screen to make it smaller or moving it further away to create a larger image.
5. Enjoy your Display
And that’s it! After following the above steps, your iPhone should now be connected to your mini projector, and you’re ready to enjoy your content on the big screen. From streaming content to giving presentations, the possibilities are endless. Just remember to disconnect everything when you’re finished, and store the equipment safely to prevent damage.
In conclusion, connecting an iPhone to a mini projector is a straightforward process that can be done with the right cable or adaptor. This will enable you to share content, display images or videos, and entertain a large group of people with ease. By following the steps outlined above, you’ll be able to set up your projector in no time and start enjoying the larger display.


