How to Change Your iPhone Personal Hotspot Password

The Personal Hotspot feature on an iPhone allows you to share your cellular data connection with other devices, such as laptops or other mobile devices. This can be a convenient way to get online when you’re on the go or when you don’t have access to Wi-Fi. However, it’s important to change your Personal Hotspot password regularly to prevent unauthorized access to your device and data. In this article, we’ll walk you through the steps to change your iPhone Personal Hotspot password.
Step 1: Open Settings on your iPhone
The first step is to open the Settings app on your iPhone. You can do this by tapping on the grey gear icon on your home screen.
Step 2: Go to Personal Hotspot settings
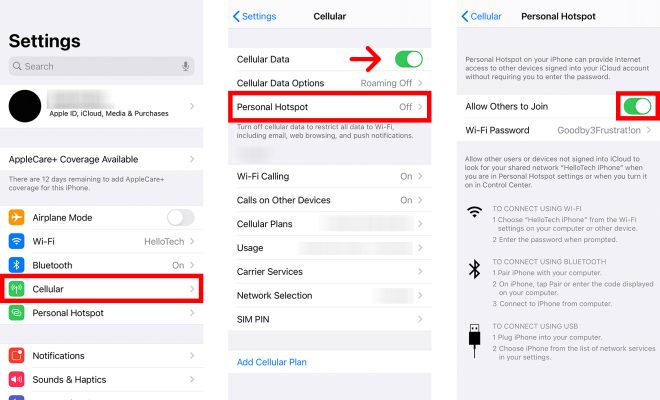
Once you’re in the Settings app, scroll down until you see the “Personal Hotspot” option. Tap on this option to go to the Personal Hotspot settings.
Step 3: Tap on Wi-Fi Password
Once you’re in the Personal Hotspot settings, you should see an option that says “Wi-Fi Password”. Tap on this option to change your Personal Hotspot password.
Step 4: Change your password
You’ll be prompted to enter your current password, followed by your new password. Make sure your new password is a strong and secure one, with a mix of upper and lowercase letters, numbers and symbols.
Step 5: Save your changes
Once you’ve entered your new password, tap on the “Done” button to save your changes.
Step 6: Connect to your Personal Hotspot
Now that you’ve changed your Personal Hotspot password, you’ll need to update the password on any devices that are currently connected to your hotspot. This will usually require you to forget the network and reconnect using the new password.
Changing your Personal Hotspot password regularly can help to keep your device and data secure. By following these simple steps, you can change your password quickly and easily on an iPhone.


