How to Change a Bicycle Brake Cable
If you’ve ever experienced a loose or unresponsive brake on your bicycle, chances are that it’s time to change your bicycle’s brake cables. Not only will this improve braking performance and increase safety, but it’s also an essential skill for any cyclist. In this article, we will guide you through the process of changing a bicycle brake cable.
Materials and Tools Needed:
– New brake cable
– Cable cutter or sharp pliers
– 5mm Allen wrench (for most bicycles)
– Cable end cap
– Cable lubricant (optional)
Step 1: Remove the Old Brake Cable
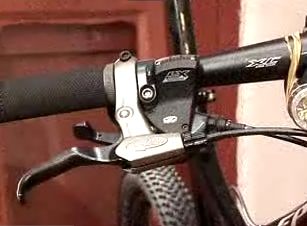
First, make sure that your bike is either on a bike stand or upside down so that you can work on it easily. Begin by releasing the brake cable from the brake caliper by loosening the pinch bolt with your 5mm Allen wrench. Once loosened, pull the cable out of its housing and unthread it from the brake lever.
Step 2: Insert the New Brake Cable
Before inserting the new cable, apply some cable lubricant along its entire length to ensure smooth operation. Next, thread the new brake cable through the brake lever and along the same path as the old cable. Be sure to seat the head of the cable in the anchor slot of the brake lever.
Step 3: Position and Connect the New Cable
Once threaded through, position your new cable in its housing. Make sure that all housing ends are properly seated in their respective ferrules—small metal or plastic caps at each end of the housing. Pull on your new brake cable to ensure that there are no kinks or obstructions.
With everything in position, feed the end of your new brake cable through the pinch bolt on your brake caliper. Squeeze your brakes together while ensuring that there are no twists in your cable as this will negatively affect braking performance. Tighten down the pinch bolt using your 5mm Allen wrench.
Step 4: Adjust Brake Tension
To ensure optimal braking performance, adjust the brake tension by tightening or loosening the barrel adjuster on your brake lever. This is a small, threaded cylinder near where your brake cable enters the lever housing. Rotate the adjuster clockwise to increase tension or counterclockwise to decrease tension. Aim for a balance of good lever feel and brake responsiveness.
Step 5: Secure and Trim Excess Cable
Once satisfied with your brake adjustment, cut off any excess brake cable with a cable cutter or sharp pliers, leaving about an inch (2-3 cm) of cable protruding from the pinch bolt. Slide a cable end cap onto the cut end of the cable and crimp it using pliers. This will help prevent fraying and extend the life of your brake cable.
And that’s it! With the newly installed bicycle brake cable, you should now have smooth and responsive braking. Regularly inspect your cables for wear and tear, and replace them when necessary to ensure safe cycling.