How to Wire a 3 Way Light Switch

Introduction
A 3 way light switch provides the flexibility of controlling a single light or group of lights from two different locations. This setup is ideal for large rooms, staircases, and hallways where it’s convenient to have multiple points of control. Wiring a 3 way light switch might seem daunting, but with the right guidance and precautions, it’s an achievable DIY project.
Required Tools and Materials
Before getting started, gather the following tools and materials:
1. Screwdriver
2. Wire stripper
3. Needle-nose pliers
4. Voltage tester
5. Electrical tape
6. Wire connectors (wire nuts)
7. Two 3-way switches
8. 14-3 Romex cable (or similar)
9. 14-2 Romex cable (or similar)
Safety Precautions
Working with electrical wiring requires strict adherence to safety measures. Ensure you:
1. Turn off power to the circuit at the main electrical panel.
2. Use a voltage tester to confirm that there’s no current flowing through the wires.
3. Wear insulated gloves and eye protection.
Step-by-step Guide
Follow these steps to wire your 3 way light switch:
1. Plan the cable route: Determine the most efficient way to run wires between the two switch locations and the light source(s). It’s important for each wire run to be as short as possible.
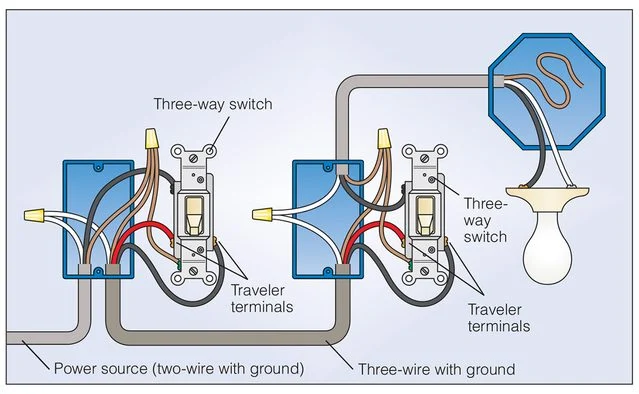
2. Install cables: Run a 14-2 Romex cable from the main power source to one of the 3-way switches (Switch 1) and a 14-3 Romex cable from Switch 1 to Switch 2 (the other 3-way switch). Then run another 14-2 Romex cable from Switch 2 to the light fixture.
3. Ground connections: Connect all ground wires from every section together using a pigtail and a wire nut. Include the ground wires from the switches and light fixture in this connection.
4. Connect Switch 1: At Switch 1, connect the live black wire from the power source to the common terminal (usually dark-colored) on the switch. Join the red and black traveler wires from the 14-3 Romex cable to the two brass-colored terminals on this switch.
5. Connect Switch 2: At Switch 2, connect the black wire leading to the light fixture to the common terminal (usually dark-colored). Attach the red and black traveler wires from the 14-3 Romex cable to the two brass-colored terminals on this switch.
6. Connect light fixture: At the light fixture, connect the black wire from Switch 2 to one of its terminal screws and then connect the white wire from Switch 2 to another terminal screw. The light fixture’s ground wire should already be connected with other ground wires.
7. Final checks: Review all connections at both switches and the light fixture to ensure no loose wires or incorrect connections remain.
8. Restore power: Turn on power at the main electrical panel and test your new 3 way light switch setup for proper functionality.
Conclusion
Wiring a 3 way light switch can be a satisfying DIY project that adds convenience and control to your lighting system. By following this detailed guide, understanding necessary precautions, and carefully double-checking all connections, you can successfully complete this task while ensuring safety and efficiency throughout the process.

