How to Make a Paper Swan: 11 Steps
Creating a paper swan can be a fun and rewarding experience. The art of origami, or paper folding, has been practiced for centuries and allows you to create beautiful figures using just a single sheet of paper. Follow these 11 steps to learn how to make your own elegant paper swan.
1. Choose your paper: Select a square sheet of paper that is easy to fold. Origami paper is ideal, but you can also use printer or construction paper as an alternative.
2. Create a diagonal crease: Fold the paper in half diagonally, with the colored side facing outwards. Unfold the paper so that you have a visible diagonal crease.
3. Form two triangles: Fold both the left and right corners of the square in towards the center crease, creating two triangles that meet at the center line.
4. Fold the bottom edge upward: Take the bottom edge of the paper and fold it upwards to align with the bottom tips of the triangles.
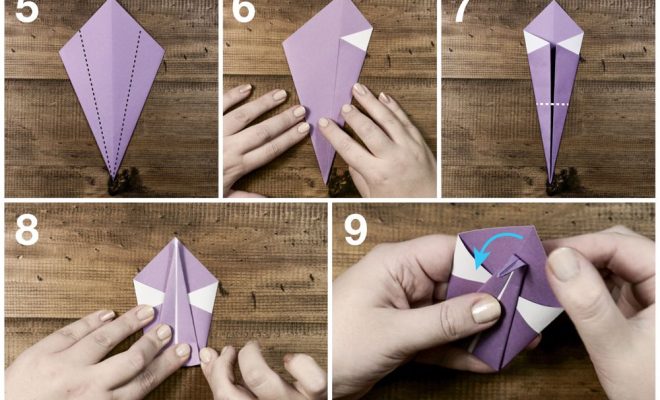
5. Create two smaller triangles: Fold both corners that are now at the bottom upwards so they meet at the center crease, forming two additional small triangles.
6. Form a rectangle: Fold down the top triangle along its horizontal edge and tuck it under layers of paper, creating a rectangular shape at the top of your original structure.
7. Create two wings: Fold both top corners that are now shaped like triangles outwards from their respective sides at around a 45-degree angle. These will become the swan’s wings.
8. Refine your wings: Fold down only the top layer of each wing’s tip so that it aligns with its base, slightly altering its angle.
9. Forming the head and neck: Gently pinch one corner of your rectangle’s base between your fingers and pull it outwards, creating an elongated section representing the head and neck of the swan. Be careful not to tear the paper.
10. Shape the head: Fold this elongated section downwards slightly to create a head-like shape, creating a visible distinction between the head and the neck of the swan.
11. Final touches: Carefully expand the wings by gently pulling on their edges, allowing them to spread apart and appear more natural. Stand your paper swan up by positioning its wings and bottom edge accordingly, balancing it on a flat surface.
Congratulations! You have now successfully made a beautiful paper swan using only 11 steps. This delicate figure can be used as a decoration or given as a thoughtful handmade gift to friends and family. Continue practicing this craft to perfect your skills and explore other exciting origami creations.