How to Make a Worry Doll: 11 Steps
Worry dolls, also known as “muñecas quitapenas” in Spanish, are small, handmade dolls originating from Guatemala. These dolls are traditionally used to help individuals alleviate their anxieties or concerns by sharing their worries with the dolls and placing them under their pillow before going to bed. Here’s a simple guide on how to make your worry doll in just 11 steps:
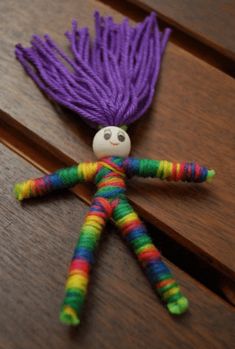
1. Gather your materials: You will need some pipe cleaners, embroidery floss or yarn, scraps of fabric, scissors, and a marker or pen for drawing the face.
2. Cut the pipe cleaner: Start by cutting a pipe cleaner to about 4 inches in length. This will serve as the base for your worry doll’s body.
3. Create the arms: Cut another piece of pipe cleaner about 3 inches long and wrap it around the center of the first pipe cleaner to form the arms. Adjust the arms so that they are equal in length on both sides.
4. Wrap the body: Choose your desired color of embroidery floss or yarn and tie one end around the intersection of the two pipe cleaners (where the torso and arms meet). Begin wrapping the floss or yarn tightly around this point until you reach the bottom of the torso. Tie off the end with a knot and trim any excess material.
5. Wrap the arms: Using a different color of floss or yarn, tie one end around an arm near the torso and wrap it tightly up to just before where you want the hands to be placed. Repeat this process for the other arm, tying off each end with a knot and trimming any excess material.
6. Wrap the legs: Wrap each leg separately using a similar process as when wrapping the body and arms. Start near the torso and wrap until just before where you want the feet to be placed.
7. Create hands and feet: Using a small amount of the wrapping material, create a loop at the end of each arm and leg to represent hands and feet. Secure these in place with a knot and trim any excess material.
8. Cut fabric for clothing: Using your scissors, cut out small pieces of fabric to resemble clothing for your worry doll. You may want to create a shirt, pants or a skirt, and even a tiny hat if you’re feeling creative.
9. Dress your worry doll: Glue or carefully tie each piece of fabric clothing to your worry doll’s body. You can use additional embroidery floss or thin yarn to secure the clothes in place as needed.
10. Draw the face: Using a fine-tipped marker or pen, draw a simple face on your worry doll’s head (the top part of the main pipe cleaner). Include eyes, mouth, and any other facial features you desire.
11. Share your worries: Your worry doll is now complete! When you have concerns or anxieties, share them with your doll before going to bed and then tuck it under your pillow. According to Guatemalan tradition, the worry doll will take away your worries as you sleep.
Having followed these 11 steps, you’ve now created a handmade worry doll that can bring comfort and peace whenever you need it most. This craft also makes for an excellent gift for loved ones who may need a little help alleviating their worries as well.