3 Ways to Write on Glass
Introduction
Writing on glass surfaces provides a creative twist to showcasing messages, highlighting special lettering, or simply exhibiting some artistic flair. It’s becoming increasingly common for businesses, home decorators, and even underwater enthusiasts. For those who are new to this unconventional means of calligraphy, consider the following three methods to get started on your glass writing adventure.
1. Glass Paint Pens
An excellent way for both beginners and experienced artists to draw on glass surfaces is by using glass paint pens. These pens are specifically designed for writing on non-porous surfaces like glass and porcelain. They come in a wide variety of colors and are easy to use with their fine-point tips.
Simply shake the pen before use and press the tip onto the glass surface to allow the paint to flow smoothly. It’s best to clean the surface before drawing so that there’s no residue or dust present that could interfere with the ink’s adhesion. Designs made using glass paint pens can be made permanent by baking them in an oven for a specific period as per the pen’s instructions.
2. Chalk Markers
Chalk markers serve as another unique method for temporarily writing on glass surfaces. With their water-based, non-toxic chalk ink, it’s a safe option for children and adults alike. Chalk markers come in various colors, including bright neon shades that pop against the glass background.
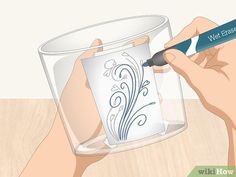
To get started with chalk markers, first prime the marker by shaking it well and pressing the tip down until the ink flows freely. If any mistakes occur during the drawing process, chalk markers can be quickly wiped away with a damp cloth or paper towel while still wet but tends to become semi-permanent when dry, requiring a window cleaner or rubbing alcohol for complete removal.
3. Etching Cream
For those seeking a more permanent form of glass calligraphy, consider using an etching cream. Etching cream works by chemically removing a thin layer of the glass, leaving behind a frosted effect. This process is perfect for creating detailed designs and monograms that stand the test of time.
First, create or purchase a stencil with your desired design and attach it firmly to the glass surface. After thoroughly cleaning the glass, apply a generous layer of etching cream to the exposed areas within the stencil. Follow the product’s instructions regarding how long to leave the cream on the glass surface, typically around 5-15 minutes. Lastly, rinse away the etching cream under running water, remove the stencil, and admire your beautifully etched design.
Conclusion
From colorful chalk markers to elegant etchings, there are numerous methods available for adding artistic messages or designs to glass surfaces. Each technique offers its own unique advantages and style, making it easy for anyone to find an approach that suits their creative needs. Explore these three ways to write on glass and experience firsthand the fun and satisfaction derived from this versatile medium.